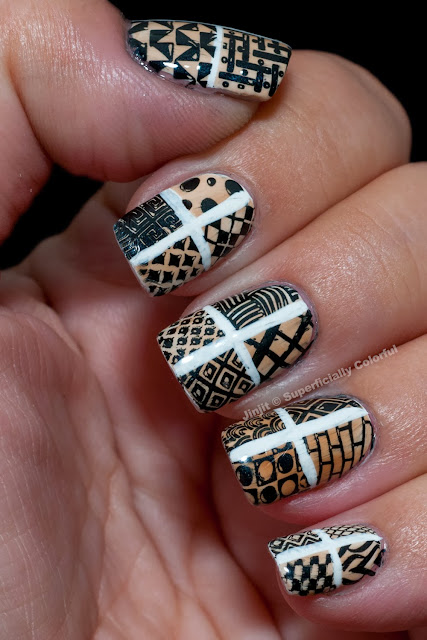
So we're starting the last 10 entries in the 33DC today, with a Geometric theme and an entry I am actually happy about. In fact, I was so happy about it that I decided to do a tutorial for it too. It's a bit of time consuming and sort of an Occupational Therapy, but I enjoyed it and I hope you would too.
So it's a black and white stamping mosaic that I decided to give a little bit of a vintage color to. The polishes I used are Cult Nails Tempest - a white opaque creme, Elevation Polish Temperance - a medium brown jelly and Konad pearl black - a special stamping polish. As for the plates - I used many. I just tried to pick the more geometric patterns from all the plates I have.
Also, sadly, I lost my patience as I went on with this mani, and I stamped over the white lines, a move that caused me to have to draw it again over the stamping. The result is a thicker line which looks a bit off. But still.... I think it is very geometric. Isn't it?
So let's go on with the tutorial shall we?
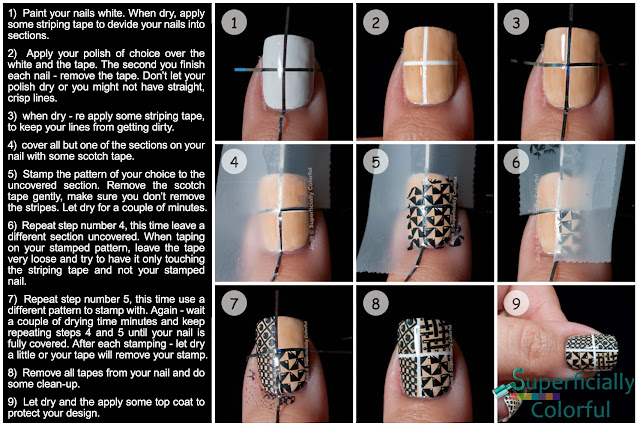
Start by painting your nails white. Let dry for 20 minutes, to make sure the tape will not peel your polish. Apply some striping tape, dividing your nail into several sections.
Apply your second color. I used a jelly color that only tinted the white. Make sure you remove the striping tape immediately after applying your polish, before it dries. If you waited too long, the lines might not be straight and crisp.
Re-apply some new striping tape onto the white lines. This is meant to keep the lines from staining with the stamping polish. You can skip that part but... well, it looks better if you don't skip it.
Over the striping tape, apply some scotch tape that will cover your entire nail - except one of the sections on which you wish to stamp. I left the bottom left area exposed.
Now for the fun part - stamp! Whatever pattern you wish to use, stamp it on the uncovered section of your nail. Right after you stamp - remove the scotch tape. Be very careful not to cause any peeling of your newly stamped pattern and also - be careful not to remove your striping tape with the scotch. Let dry for several minutes.
Now cover your nail with some scotch tape again, leaving a different section of the nail exposed. Make sure the tape doesn't touch your stamped pattern directly. Then stamp again with a different pattern. Remove scotch tape and let dry.
Drying time is actually depending on the polish you used for stamping. I used a special Konad polish which takes a little longer to dry so I waited at least 5 minutes between each stamp. If you use foil effect polishes, they usually dry in seconds and you can wait a lot less between stamps. Just be careful not to ruin one pattern with the tape or your stamper.
Continue the process until your nail is fully covered (or until you're happy with your design).
Remove all your tapes including the striping tape. Let dry for a little bit and apply top coat to protect your design.
I hope you enjoyed this design and the tutorial. I also made a shorter version, in case you want to save it or share on line. And if you decide to use it - please post your mani to my Facebook wall! I would love to see it!


7 comments :
This is fantastic!! I love all the different patterns together!
I love the result, it's just lovely and very trendy! But I can't manage all that waiting , you know!
It is very time consuming - but the result is totally worth it :)
amazing!!!! <3
So pretty, I've done something similar for the 3 pattern day, and mine didn0t came out that sharp, you've done a great job :)
What a patience you must have to finish this!!! :-) Incredible! :-)
so cool! i really love this idea
Post a Comment
I love comments and I appreciate each one of yours!
I would love to hear from you but please, refrain from posting links. If you have a link that you want me to see - just email me :)
Thank you so much!